I wanted to setup a kubernetes cluster in my homelab one day and I decided to setup Talos Linux in my proxmox node.
Introduction
Talos Linux is developed by Sidero Labs and designed from the ground up as a secure, immutable, and minimal operating system for Kubernetes. This means that there's no unnecessary packages, no SSH access, no shell, in another words, no cybersecurity headaches. 😄
Interacting with the OS is done by talosctl to communicate with the API using mTLS.
Reference Documentations
Reference Documentation: https://docs.siderolabs.com/talos/v1.9/platform-specific-installations/virtualized-platforms/proxmox
Requirements
Required: You will need to install talosctl first on your terminal before you can follow the guide below.
curl -sL https://talos.dev/install | shtalosctl install script
Deploying in Proxmox
In order to support QEMU guest agent (similar to Vmware tools), we need a custom ISO from Image Factory. Follow the steps below:
- Hardware Type: Cloud Server
- Choose Talos Linux Version: I chose the latest version 1.12.2 which is the stable version
- Cloud: nocloud
- Machine Architecture: Choose whatever that fits you. Mine is amd64.
- System Extensions: siderolabs/qemu-guest-agent (10.2.0)
- Customization: Default
- Download the ISO. Remember the installer image URL under Initial Installation header.
After which, follow your usual steps in creating a VM in proxmox or refer to the documentation above. Once done, boot the VM and do not apply any IP configuration on the grub bootloader portion, keep it as default.
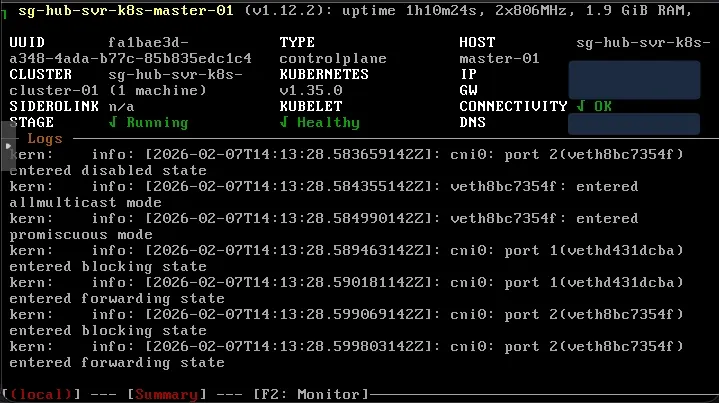
Once you see the Talos Linux booted, take note of the IP address in the top right. Generate the machine configuration using the following command:
talosctl gen config <your desired cluster name> https://$CONTROL_PLANE_IP:6443 --output-dir _outThis will create serveral files in the _out directory: controlplane.yaml, worker.yaml and talosconfig.
This is where you have to get your hands dirty and edit the yaml files if you wish to apply static IP and configure the hostnames, etc.
This is what I did for mine. An example showing snippets of controlplane.yaml is shown below:
certSANs:
        - sg-hub-svr-k8s-master-01
        - sg-hub-svr-k8s-master-01.alexlogy.io
        - 10.0.7.71
Add your hostnames and any additional IP addresses into the certSANs field
network:
        hostname: sg-hub-svr-k8s-master-01
        interfaces:
            - interface: eth0
              addresses:
                - 10.0.7.71/24
              routes:
                - network: 0.0.0.0/0
                  gateway: 10.0.7.1
                  metric: 1024
              mtu: 1500
        nameservers:
            - 10.0.7.1
Define your desired static IP and network information in the network field
controlPlane:
        endpoint: https://10.0.7.71:6443 # Endpoint is the canonical controlplane endpoint, which can be an IP address or a DNS hostname.
Remember to modify this endpoint field to match your new static IP configured above
# ---
# apiVersion: v1alpha1
# kind: HostnameConfig
# auto: stable # A method to automatically generate a hostname for the machine.

# # A static hostname to set for the machine.
# hostname: controlplane1
# hostname: controlplane1.example.org
I commented out HostnameConfig portion because I already defined my hostname in network field above
Once done, apply the controlplane.yaml to the node you setup earlier. Remember the IP address shown in the VM console? You will need it here.
talosctl apply-config --insecure --nodes <talos linux dhcp ip> --file _out/controlplane.yamlOnce you applied the command above, you should see outputs in your VM console and the stage still showing as booting. This is because we have not bootstrap our node.
Run the following commands:
export TALOSCONFIG="~/tmp/_out/talosconfig"
talosctl config endpoint 10.0.0.71
talosctl config node 10.0.20.71
talosctl bootstrap
If everything is successful, you should see the VM console showing the stage as Running now.
Get your kubeconfig
Once you setup your worker nodes, you can retrieve the kubeconfig using the following command:
talosctl kubeconfig .Then check your kubernetes cluster by running the kubectl command:
➜  kubectl get nodes
NAME                       STATUS   ROLES           AGE     VERSION
sg-hub-svr-k8s-master-01   Ready    control-plane   74m     v1.35.0
sg-hub-svr-k8s-worker-01   Ready    <none>          2m58s   v1.35.0
Sample output from my kubernetes cluster
Additional Troubleshooting Steps
Side Note: If there's an error showing:
no context is setIt means that your talosctl is not using the talosconfig generated previously. You can make your life simpler by running the following command to avoid exporting the environment variable TALOSCONFIG in new sessions.
talosctl config merge _out/talosconfigYou can then see the contexts configured for your talosctl:
➜  talosctl config contexts
CURRENT   NAME                        ENDPOINTS    NODES
*         sg-hub-svr-k8s-cluster-01   10.0.0.71   10.0.0.71
Now you have your control plane running, you can create additional control plane for HA if needed, and most importantly, your worker nodes. Repeat the steps above and remember to configure the yaml files before applying the configuration to the node.