I'm sure every DevOps engineer will touch on Jenkins at least once in their professional career. Today, we will talk about how to scale your Jenkins with Kubernetes.
This setup will make your Jenkins master as the orchestrator and configuration storage, it does not build any jobs on the master. As such, you can scale your master instance small in this case.
Pre-requisites
First, you have to setup a Jenkins master instance. I will not be going in-depth on this. For me, I prefer to run my Jenkins master on an EC2 instance as I prefer to run stateful applications outside of Kubernetes.
Once that is done, install this Plugin (https://plugins.jenkins.io/kubernetes/) in your Jenkins master instance.
Next, you can prepare a kubeconfig file and aws cli credentials file according to this article here (https://alexlogy.io/how-to-authenticate-with-different-eks-clusters-in-aws/).
Save the files to be used for the steps below.
Creating Jenkins' Agent Dockerfile
Once the above is done, we will have to create a Dockerfile to define how our agent will be and include all the tools required for our CI/CD processes. For example, our agent should have kubectl, aws cli, helm cli, etc, installed.
I will show you a sample of my Dockerfile for my agent. I prefer to use debian for my agent, you can choose any distro of your own preference.
FROM debian:bullseye-slim

LABEL author="DevOps"
LABEL maintainer="[email protected]"

WORKDIR /jenkins

ENV TZ='Asia/Singapore'
ENV LANG C.UTF-8
ENV LANGUAGE en_US:en
ENV LC_ALL C.UTF-8

# Update and install dependencies
RUN apt-get update && apt-get -y install \
    ca-certificates \
    curl \
    gnupg \
    lsb-release \
    net-tools \
    curl \
    wget \
    nano \
    zip \
    unzip \
    python3 \
    python3-pip \
    openjdk-11-jre-headless \
    jq

# Install Docker
RUN mkdir -p /etc/apt/keyrings \
    && curl -fsSL https://download.docker.com/linux/debian/gpg | gpg --dearmor -o /etc/apt/keyrings/docker.gpg \
    && echo \
    "deb [arch=$(dpkg --print-architecture) signed-by=/etc/apt/keyrings/docker.gpg] https://download.docker.com/linux/debian \
     $(lsb_release -cs) stable" > /etc/apt/sources.list.d/docker.list \
    && apt-get update \
    && apt-get install -y docker-ce docker-ce-cli containerd.io docker-compose-plugin \
    && systemctl enable docker \
    && service docker start

# Install AWS CLI
RUN curl "https://awscli.amazonaws.com/awscli-exe-linux-x86_64.zip" -o "awscliv2.zip" \
    && unzip awscliv2.zip \
    && ./aws/install \
    && rm -rf ./aws && rm -rf awscli-exe-linux-x86_64.zip

# Install Kubectl
RUN curl -o /usr/local/bin/kubectl -LO https://dl.k8s.io/release/v1.23.0/bin/linux/amd64/kubectl \
    && chmod +x /usr/local/bin/kubectl

# Install Helm
RUN wget https://get.helm.sh/helm-v3.9.2-linux-amd64.tar.gz \
    && tar zxvf helm-v*.tar.gz \
    && mv linux-amd64/helm /usr/local/bin/helm \
    && chmod +x /usr/local/bin/helm \
    && rm -rf linux-amd64 \
    && rm -rf helm-v*.tar.gz \
    && helm plugin install https://github.com/hypnoglow/helm-s3.git \
    && export HELM_S3_MODE=3

# Install Earthly
RUN wget https://github.com/earthly/earthly/releases/latest/download/earthly-linux-amd64 -O /usr/local/bin/earthly \
    && chmod +x /usr/local/bin/earthly

# Install Jenkins Remoting
RUN groupadd -g 10000 jenkins \
    && useradd -d /jenkins -u 10000 -g jenkins jenkins \
    && curl --create-dirs -sSLo /usr/share/jenkins/slave.jar https://repo.jenkins-ci.org/public/org/jenkins-ci/main/remoting/4.9/remoting-4.9.jar \
    && chmod 755 /usr/share/jenkins \
    && chmod 644 /usr/share/jenkins/slave.jar

# Final Setup
COPY ./jenkins-slave.sh /usr/local/bin
COPY ./awsconfig /root/.aws/config
COPY ./awscredentials /root/.aws/credentials
COPY ./kubeconfig /root/.kube/config

RUN chmod +x /usr/local/bin/jenkins-slave.sh

# cleanup
RUN apt-get autoremove && apt-get clean && rm -rf /var/lib/apt/lists/*

## Docker Buildkit Activation
ENV DOCKER_BUILDKIT=1

RUN echo "hosts: files dns" >> /etc/nsswitch.conf

ENTRYPOINT service docker start && /usr/local/bin/jenkins-slave.sh
If you realised, my Dockerfile includes various files that are being copied into the Docker image such as awsconfig, awscredentials, kubeconfig, etc. These files should have been prepared in the previous section.
If you inspect the Dockerfile even closer, you will realise that my Jenkins' agent has docker daemon in it. Yes, you're right, I like to use docker to build all my stuffs. This will be a Docker-in-Docker (dind) setup for the agent.
I'm also enabling Docker Buildkit with the environment variable as it will enable parallelism in my build process, resulting in faster builds.
For jenkins-slave.sh file, you can refer to my GitHub repository to obtain the file (https://github.com/alexlogy/jenkins-agent-docker).
Once all these are done, you should build this image and push to a docker registry of your choice.
Important Note: As this image will contain your AWS credentials and kubeconfig files, DO NOT push this image to any public registry.
Configuring Jenkins master
Once the above steps are done, we can now proceed to the configuration for Jenkins master. If you have installed the plugin above, you can visit the URL below to go to the configuration page.
<https://<jenkins url>/manage/configureClouds/
Otherwise, you can go to Manage Jenkins page and click Configure Clouds.
Click the button labeled "Add a new cloud" then click "kubernetes".
I will use screenshots to explain the upcoming configurations.
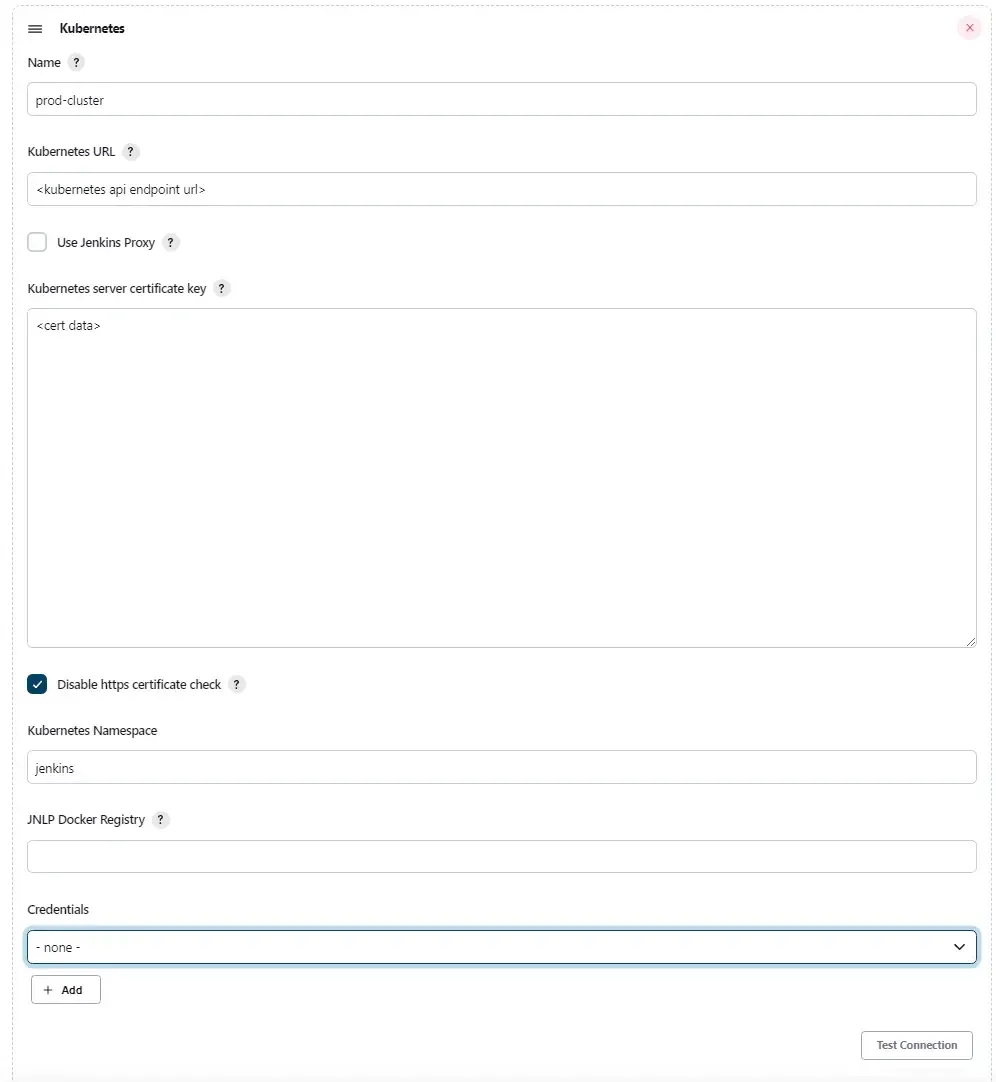
In this part, we will configure our Kubernetes endpoint URL and cert data which can be obtained using AWS cli as mentioned in my other article (URL listed above).
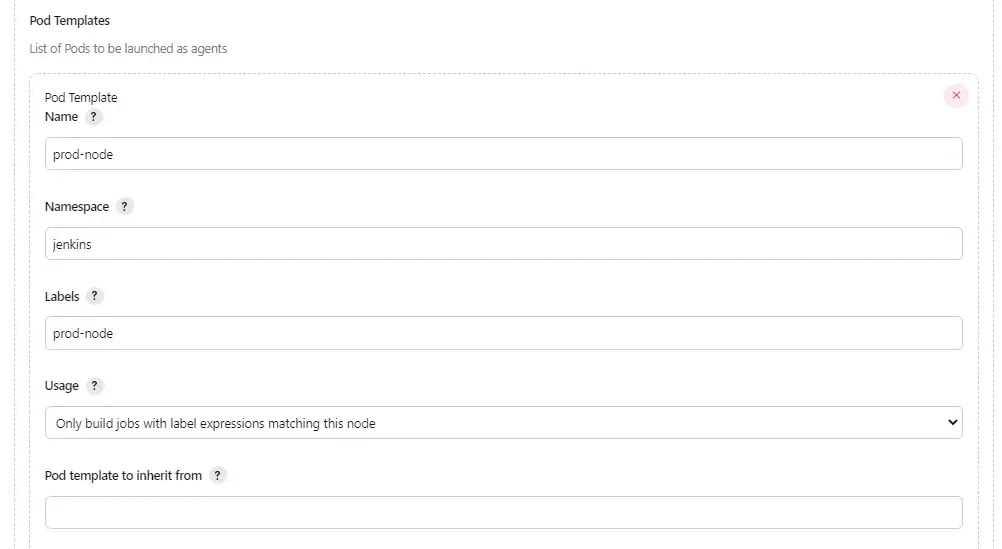
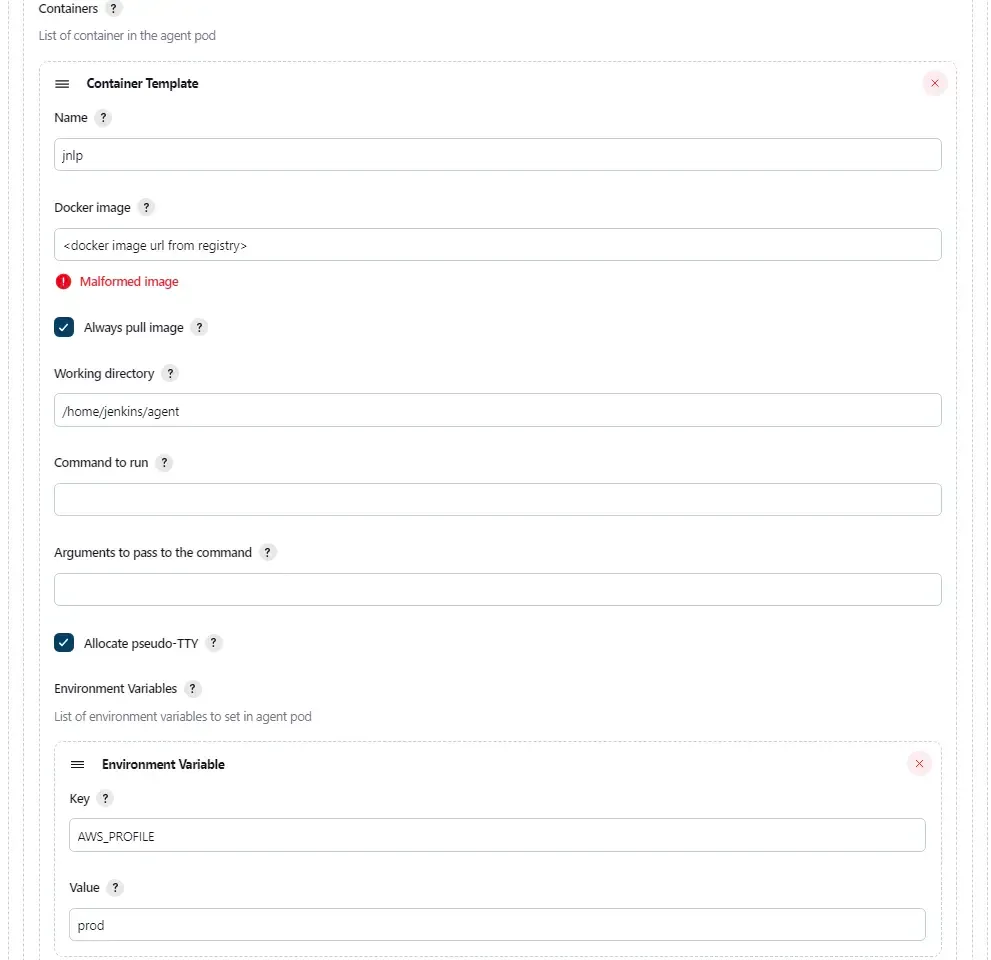
In this part, we configure the docker image of the agent which we have built and pushed in the previous section.
Remember to check the "Allocate pseudo-TTY" checkbox so that all the output of the pod will be sent over to Jenkins console.
The last part on the environment variables are configured according to how I configure my AWS cli with different profiles.
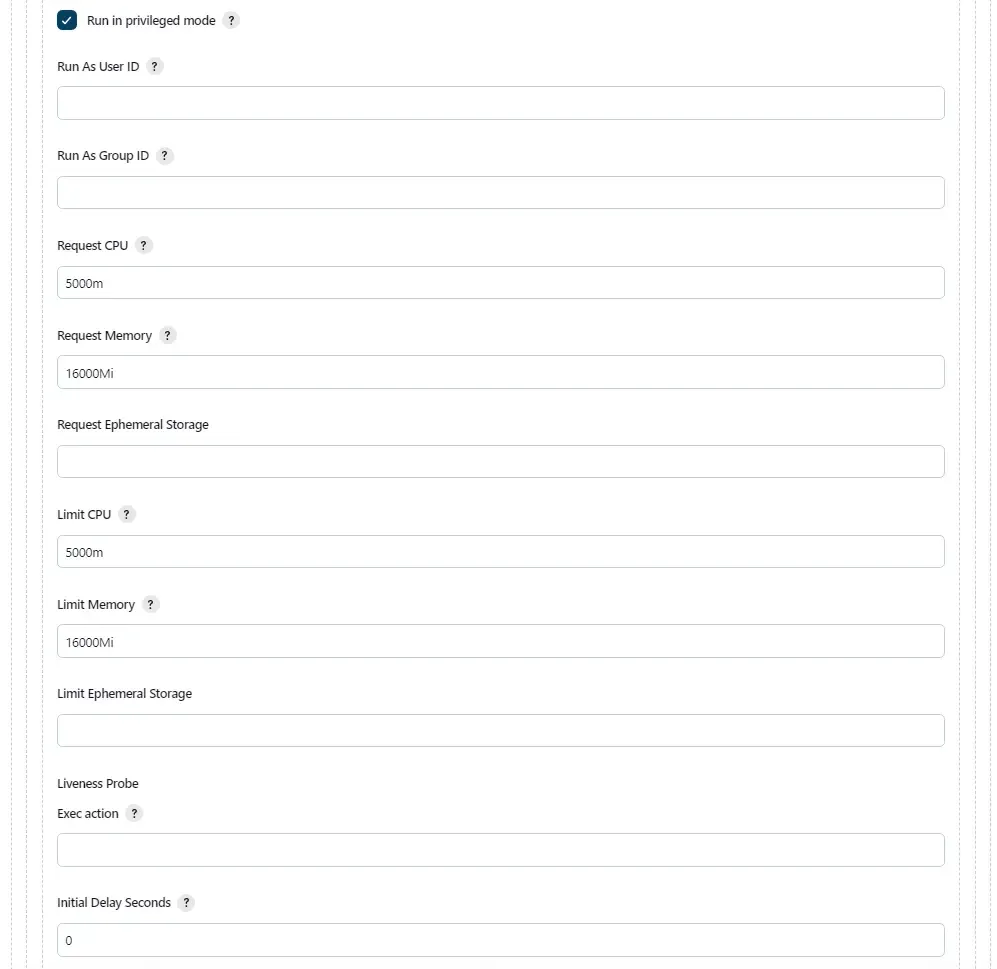
Remember to check the checkbox for "Run in privileged mode" so that our pod have root access, allowing for Docker-in-Docker (dind) mode.

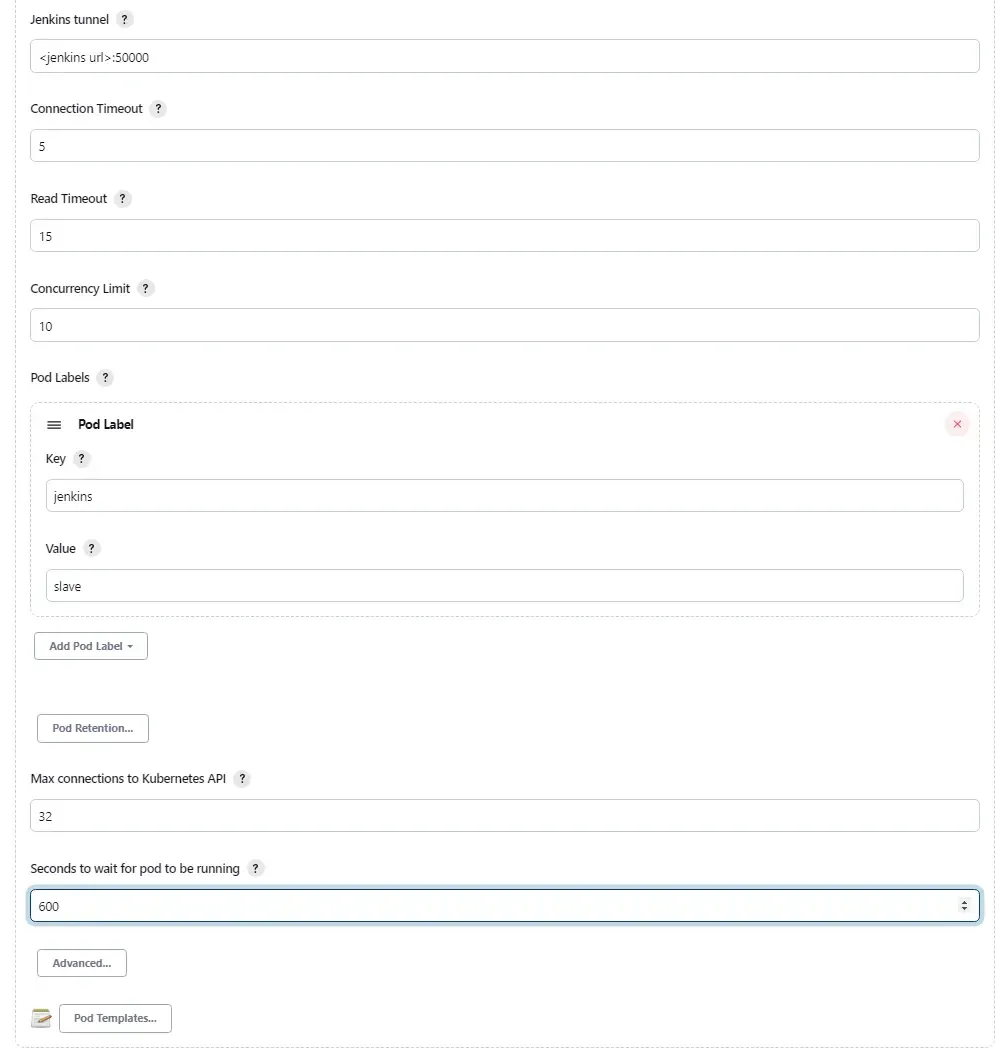
The final part will be creating the yaml portion to be merged into the kubernetes pod definitions. If you look closely, I'm setting hostAlias to bind my jenkins master url to the private ip address of the jenkins master. This allow my agent to communicate with my jenkins master using internal network instead of public IP.
The remaining part of the yaml will be our taints and tolerations to define which nodes our agent will run on in the kubernetes cluster.
Configure Jenkins' job to use these agents
We have come a long way in this article to reach this section of the article. We will now have to configure our job to restrict it to run only on these agents with the labels as configured in the last section.
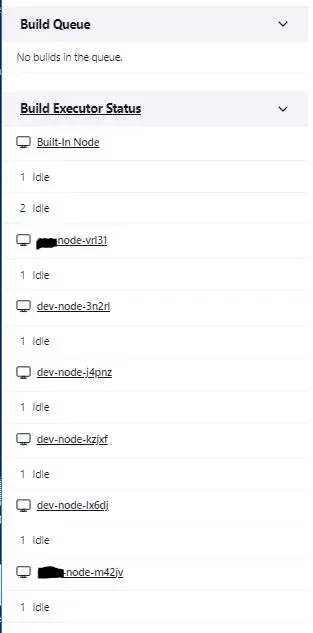
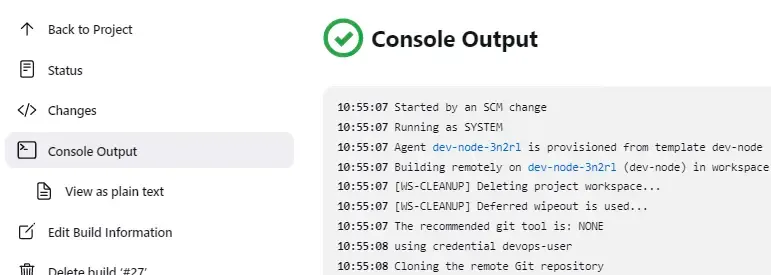
If everything was configured as described, you should be able to see similar output as this:
Congratuations! You have successfully configured Jenkins' agents to run in your respective Kubernetes cluster!